
All Activity
- Today
-
Open Ship Setup and configure two propellers. Propeller 1 is port and Propeller 2 is starboard. Enable Azimuth drive and position the Port pod swivel and Starboard pod swivel markers. Each marker sets the pod’s swivel axis and thrust location. Choose a Pod model for each side: Ocean Star (built-in) includes the housing and an animated propeller. Adjust Model scale to fit your hull. A scale of 1.0 uses the original Ocean Star size. Custom FBX uses your own meshes. Assign the housing under the pod swivel and the separate blade mesh under the corresponding propeller. Set the propeller’s spin pivot and axis there. Click Save JSON and reload the ship. In single-player, the Azipod HUD lets you control thrust and angle for both pods together or independently. Using custom FBX meshes on both sides Merge the following fields into your existing boat.json. The first entry in each array is port, and the second is starboard. Replace the mesh names with the exact names shown in Ship Setup and adjust the positions to fit your ship. All positions are in ship-local centimetres. To use two Ocean Star pods, set useBuiltInModel to true in both pods entries. With the built-in models, you can omit the housing and propeller mesh fields and set visualScale separately for each pod.
-
 Ocean Star is ready for a test sail ingame.
-
Across the Seas - Release Notes
MarkoBarthel replied to MarkoBarthel's topic in Across the Seas - Alpha
Alpha Version 0.0.33 - Reworked design for the mooring window - Redesigned settings menu - Fixed distored images in the boat selection menu - Larger watercrafts uses now fuel in tons - Imported watercrafts can also show fuel in tons now - Scenery Editor you can now adjust the height of the border from the low-poly-terrain - Scenery Editor you can now adjust the spacing between your scenery and the low-poly-terrain - Scenery Editor added industrial warehouses - Added FPOM shader to rocky landscape material - Added habor camera key 5 (default and imported scenery) you can set an static harbor camera in the editor - Added start point for Freefly Cam (default and imported watercrafts) - Added Nanite grass to grassland (you can set density and visibility in the settings menu) - Added Metahuman crowds (first test on the Ocean Star Liner and Calais) - New vessel, Ocean Star Liner added - Removed over 3000 lighthouses and replaced these with other type of maritime beacons - Reworked glass material for default and imported watercrafts (can selected via editor) - Added rain drops to watercraft windows (size for imported boats can be adjusted via JSON code) - Yesterday
-
Imported ships Open your ship in the Ship Editor and select Materials / collision sidedness. Under Rain Glass, tick the FBX materials used by your windows. Give the glass its own material slot in your FBX so the effect applies only to the glass. Set Rain Drop Size Scale. 1.0 uses the default size. Try 0.5 for smaller droplets or 0.25 for a finer effect on large panes. Click Save JSON, then reload the ship in rainy weather to check the result from the bridge. Rain glass is two-sided by default, so it can be seen from inside and outside. You can make individual materials one-sided under Material exceptions. You can also add the following block at the top level of your existing boat.json. Use the exact material names from your FBX.
-
Hey, welcome here. Currently the electrical and shore power system is only client side calculated and not synchronized with the server. I have planned this for an later update in connection with multi-crew functionality. At the moment I try to keep the server load as low as possible. Maybe I can add this with the release of the dedicated standalone server.
-
 The electrical system with shore power and multiple generators sounds like a solid foundation. For the 8-player test, are you syncing electrical states server-side, or letting each client simulate and correct? I ask because generator and shore-power transitions are where desync tends to show up first.
- Last week
-
elfredaclark joined the community
-
Panoramic night view coast of Falmouth and teaser of the next ship which is coming with the next update.
-
 TheChickenTendy joined the community
-
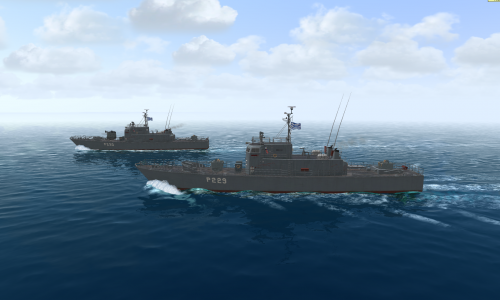 My Grandpa served on a Asheville-class gunboat. He was on the USS Chehalis. I have been trying to locate an STL of one of these boats so I can 3D print one for him. Is it possible for you to share the model?
-
 Liam Williams joined the community
-
Scenery Editor and Custom Harbour Guide
MarkoBarthel replied to MarkoBarthel's topic in Scenery creation
With the next update, its also possible to adjusting the transitions between the low-poly terrain and the imported scenery. -

Scenery Editor and Custom Harbour Guide
Christopher Parker replied to MarkoBarthel's topic in Scenery creation
For the Hirtshals layout, I’d check the FBX scale and pivot before placing many objects; if the origin is off, aligning quay edges to the library bollards gets fiddly. Keep textures under the package’s Textures folder and use relative paths in harbour.json so the draft stays portable. The Superspeed ferry should make a good scale reference. -
Christopher Parker joined the community
-
 jer joined the community
-
Fuel setup for imported ships Open your ship’s boat.json and add the six fuel settings to the handling section. The example below configures a twin-engine ship with a shared 2,500-tonne tank that starts full. Adjust the FBX filename and ship setup values to match your model. Enter fuel consumption per engine. The simulator adds the consumption of all running main engines. In this example, one engine at full throttle uses 4,700 L/h. Both engines at full throttle use 9,400 L/h combined, or about 7.90 t/h. Enter tank quantities in litres and consumption rates in litres per hour in the JSON. Set bDisplayFuelInTonnes to true to see tonnes and t/h in the vessel status panel. Set it to false to display litres and L/h. You can also adjust these settings in the Ship Editor under Handling → Fuel. Save the JSON and start a new voyage to apply the changes.
-
Scenery Editor and Custom Harbour Guide
MarkoBarthel replied to MarkoBarthel's topic in Scenery creation
This looks superb, awesome start mate. Looking forward to take a sail. -
 MarkoBarthel reacted to a post in a topic:
Scenery Editor and Custom Harbour Guide
-
Thanks for the update, mate! I'm trying to import some Hirstshals scenery now. This is just a test for the moment, but I'll turn it into full 3D scenery soon. I'm preparing the layout and ground textures first. It's already getting ready for the Superspeed Ferry Color Line vessel. how it looks like
- 4 replies
-
- 1
-
-
- guide
- sceneryeditor
- (and 1 more)
- Earlier
-
VSV7 reacted to a post in a topic:
Scenery Editor and Custom Harbour Guide
-
Across the Seas Scenery Editor and Custom Harbour Guide Create a harbour by placing game-library objects, importing your own static FBX models, or combining both. Use `harbour.json` to define the package and its location. Use the in-game **Scenery Editor** to arrange the objects and export the finished harbour. 1. Create a draft In the game directory that contains `Mods`, create a folder under `Mods/Sceneries`. For a standard Windows installation, the path is `Windows/AcrosstheSeas/Mods/Sceneries`. ```text Mods/ Sceneries/ MyFalmouthHarbour/ harbour.json Quay.fbx Textures/ ``` Save the following as UTF-8 in `harbour.json`. The coordinates are an example near Falmouth. Use your own coordinates and a unique ID for your project. If you do not have a `Quay.fbx` yet, remove that entire entry. A library-only draft can also start with `"models": []`. If your installation includes **Falmouth Demo**, you can open it directly to try the controls. 2. Build in the Scenery Editor 1. From the main menu, open **Scenery Editor**. Select a draft from **Editable sceneries** or click its **D** marker on the map. Choose **Edit scenery**. 2. Fly with **WASD**. Hold the **right mouse button** to look around, use **Page Up / Page Down** to change altitude, or hold **Shift** to move faster. **Esc** opens the pause menu and gives access to **Settings**. 3. To add a built-in object, search or browse the **Object library**, then select an entry to see its preview. Choose **Place library object** and click the terrain. Click again to place another copy of the same object, or choose **Cancel placement** to finish. 4. Click an object in the scene or its entry under **Placed objects** to select it. Hold **Ctrl** while clicking to select multiple objects. Use **Focus selected object** to find the current selection. 5. Use **Move** to drag a coloured axis, **Rotate** to drag the yaw ring, or **Scale** to drag the square handle for uniform scaling. You can also enter **X**, **Y**, **Z**, **Yaw**, and **Scale** directly. **Place with mouse** relocates the selection at its current height. **Snap to ground** adjusts the selection vertically to the ground below it. **Snap** enables 0.5 m position increments and 15° rotation increments where applicable. 6. Use **Duplicate and place**, **Undo**, or **Redo** as needed. Enter a group name and press **Enter** to assign a group. Use **Lock / unlock group** to protect it from accidental edits. **Delete selected library objects** removes library objects. To add a new FBX file or remove a custom FBX entry, close the editor and edit `harbour.json`. 7. Check your work with **Day preview** and **Night preview**, then click **Save draft**. Save before returning to the main menu or editing the JSON by hand. The library includes residential, commercial and industrial buildings, plus harbour equipment such as bollards, fenders and a floodlight. The library bollard provides a mooring point. The library floodlight switches on during night hours. 3. Edit `harbour.json` directly | Field | Meaning | | --- | --- | | `schemaVersion` | Set to `1`. | | `id` | Unique package ID. Use up to 80 lowercase ASCII letters, digits, dots, hyphens or underscores. | | `displayName` | Name displayed in the editor. Defaults to the package ID. | | `status` | Use `"draft"` to edit in the Scenery Editor and `"published"` for normal play. Set it explicitly. | | `anchor` | Geographic origin for the package. Use decimal degrees, with negative longitude west of Greenwich. Bounds are ±85° latitude and ±180° longitude. Optional `altitudeMeters` defaults to 0. | | `models` | Up to 256 placements. A published harbour needs at least one. | | `file` or `libraryId` | Use exactly one per model. Use a local FBX filename such as `"Quay.fbx"`, or a known library ID such as `"small-house"`, `"harbour-bollard"`, `"harbour-fender"`, `"harbour-atlantic-fender"` or `"harbour-floodlight"`. For other library objects, place one in the editor, save the draft and copy its generated ID. | | `offsetMeters` | Local `[X, Y, Z]` in metres from the anchor. Positive Z raises the object. Each axis must stay within ±2,000 m. Default is `[0, 0, 0]`. Confirm X and Y orientation in the editor. | | `yawDegrees`, `scale` | Rotation about the vertical axis (−360° to 360°) and uniform scale (0.01–100). Defaults are 0 and 1. | | `group`, `groupLocked` | Optional editor grouping. Group names can be up to 64 characters. The lock is a JSON boolean. | For custom models, use static geometry with a predictable pivot and check the scale against an in-game object. Put each FBX beside `harbour.json`. Keep external textures inside the package, preferably beside the FBX or in `Textures/`. Use simple materials and check that the textures load in the game. Reuse the same filename in multiple model entries to place copies at different positions. The manifest limit is 256 KiB. Unique FBX files in a package may total up to 64 MiB. Imported FBX placements are also subject to a combined limit of 2 million vertices, including repeated FBX placements. Keep meshes well below the limit for smoother loading. Optional custom terrain Add `terrainReplacement` at the top level of `harbour.json` and add your replacement mesh as a regular FBX model in `models`. For example, the following is the value of the `terrainReplacement` field. The rectangle must have west < east and south < north, with a maximum span of 0.25° on each axis. It hides the streamed low-poly terrain inside the rectangle while the harbour is loaded. Keep the rectangle tight around the replacement and check its edges from the water. This is a visual replacement. It does not alter water height, seabed depth or navigation charts. Imported scenery meshes have collision disabled. 4. Publish and install 1. In the editor, choose **Export finished scenery**. The game saves the draft and writes a ZIP under `Saved/SceneryExports`. The export contains a copy of the manifest marked `"published"`, the referenced package FBX files, and supported image files from the package directory. Built-in library assets are referenced by ID. Exports support up to 1,024 asset files and 512 MiB of asset data. Keep the draft as your editable source. 2. Share the ZIP with any required asset credits and include only files you have permission to redistribute. 3. To install, extract the package folder from the ZIP into `Mods/Sceneries`. Check that the extracted folder contains `harbour.json` and the bundled assets. To update a harbour, replace the previous published package with the new one. Multiple published packages with the same ID are skipped. 4. Reopen the voyage selection to see the published harbour's **M** marker on the map. Start or resume a single-player voyage near the harbour to see it load. Drafts are listed in the Scenery Editor and stay out of normal play. If a draft is missing, check its folder, file name, JSON syntax and `status`. Confirm that the anchor is within the playable world and that every FBX or library ID exists. If models appear below ground, adjust **Z** or use **Snap to ground**. If you edit the model list or anchor in JSON, reopen the draft before using **Save draft**. Full example JSON with terrain placement, custom loaded harbor terrain and bulding placed with the editor.
- 4 replies
-
- 1
-
-
- guide
- sceneryeditor
- (and 1 more)
-
Across the Seas - Release Notes
MarkoBarthel replied to MarkoBarthel's topic in Across the Seas - Alpha
Alpha Version 0.0.32 - Hotfix version for deleting the remaining single terrain files -
Reworked UI. The the first version of the ingame scenery editor.
-
Across the Seas - Release Notes
MarkoBarthel replied to MarkoBarthel's topic in Across the Seas - Alpha
Alpha Version 0.0.31 - Ship Editor added support for collision.fbx file - Scenery Editor added first version of the ingame editor - Scenery Editor added model library to the editor - Low-Poly-Terrain level of detail "Medium" and "High" added Roughness texture channel - Low-Poly-Terrain new level of detail "Ultra" with heightmaps and ambient occlusion - Low-Poly-Terrain new level of detail "Ultra" for trees uses now Quixel Nanite trees - Low-Poly-Terrain "Trees Ultra" arranged according to regional tree species -
Across the Seas - Release Notes
MarkoBarthel replied to MarkoBarthel's topic in Across the Seas - Alpha
Launcher 1.0.13 - Updated Layout - Link to full release notes added -
First-Person Walking on Imported Ships
MarkoBarthel replied to MarkoBarthel's topic in Importing your own watercrafts
First-Person Collision for Imported Ships Imported ships can now use an optional collision FBX for first-person walking in singleplayer. You can use it on its own or combine it with the collision boxes already available in Ship Setup. Prepare the collision model Export a lightweight Collision.fbx using the same origin, axes, and scale as the visual ship model. Each mesh object in the file becomes one convex collision hull. Use separate solid shapes for decks, walls, and consoles. A solid wedge works well for stairs. To keep a doorway open, use separate shapes on either side and above the opening. A single hull spanning the doorway will block it. Configure and test Place Collision.fbx next to boat.json in your ship folder. In Ship Setup, select the FPS entry point and enter Collision.fbx in the Collision FBX field. The FBX appears as a blue wireframe and the collision boxes appear in green. Place the entry point at foot level on a walkable surface, enable FPS walking, and save. Start a new voyage to test the entry point, walkable areas, and doorways. You can also configure the file directly in boat.json. Add collisionFile to your existing firstPerson section and keep any boxes entries you still need. Here is a minimal example using only the FBX. Replace entryCm with the position of your own entry point. When sharing the ship, include Collision.fbx in the package. It provides collision for the walking character and follows the ship as it moves. -
VSV7 reacted to a post in a topic:
Across the Seas - Release Notes
-
VSV7 reacted to a post in a topic:
Across the Seas - Release Notes
-
VSV7 reacted to a post in a topic:
Across the Seas - Release Notes
-
VSV7 reacted to a post in a topic:
Across the Seas - Release Notes
-
Across the Seas - Release Notes
MarkoBarthel replied to MarkoBarthel's topic in Across the Seas - Alpha
Alpha Version 0.0.30 - All terrain tiles packed into container files (90 container files instead of 14.500 single files) - Removed the old single terrain files in conjunction with the new Launcher version -
Across the Seas - Release Notes
MarkoBarthel replied to MarkoBarthel's topic in Across the Seas - Alpha
Launcher 1.0.12 - New Release for the new scenery streaming system - Terrain is now streamed from container files instead from single tile files - Launcher is able to delete the old single terrain tile files from the game directory -
 John1331 joined the community
-
Across the Seas - Release Notes
MarkoBarthel replied to MarkoBarthel's topic in Across the Seas - Alpha
Alpha Version 0.0.29 - Test build for scenery container streaming - Test of game structure update for container streaming -
Across the Seas - Release Notes
MarkoBarthel replied to MarkoBarthel's topic in Across the Seas - Alpha
Alpha Version 0.0.28 - Editor added support for LOD's (LOD 0, LOD 1 and LOD 2) for imported watercrafts - Editor added status messages for FBX import (also if import failed) - Editor added multi FBX file import (all files sharing one polycount-limit of 2 million) - Editor added First Person walk mode for imported watercrafts (preview feature) - NEW, "standby modus" for 3d instruments when selected Orbitcam and Freelook Cam - Test version for new packed scenery files (Plymouth area now packed in a container file) -
 Faethon joined the community
-
VSV7 reacted to a post in a topic:
First-Person Walking on Imported Ships
-
First-Person Walking on Imported Ships
MarkoBarthel posted a topic in Importing your own watercrafts
Imported ships can optionally support first-person walking in singleplayer. Ship creators can define an entry point and add simple collision boxes for floors, walls, and consoles. Every time the player enters first-person mode, they return to the configured entry point, even if they walked away from it before switching to the exterior view. Set up walking in the Ship Editor Open your ship in Ship Setup and select FPS setup. Place the FPS entry marker at foot level, on top of the intended floor. Set Entry yaw to choose which way the player faces. Select + Collision box to add a floor. Use the wireframe preview to position, resize, and rotate the box. Add more boxes for walls and obstacles as needed. Turn FPS walking on, select Save JSON, and start a new voyage to test the setup. The entry needs a walkable floor and enough clearance for the player to stand. If the entry is blocked or has no walkable floor, the game keeps the current camera view and shows a message. Configure boat.json directly Add this optional section to your existing boat.json: Positions and sizes are in ship-local centimeters, with X forward, Y starboard, and Z up. sizeCm is the full size of the box. In this example, the floor is 20 cm thick and its top is at Z = 100 cm, matching the entry height. You can add up to 64 collision boxes. Omit firstPerson or set "enabled": false to keep walking disabled. The boxes move with the ship and block the player without applying physical forces to the vessel. In first-person mode, the ship uses LOD 0 and its 3D bridge instruments update normally.
